Laptop Cart Timers
One mistake that schools often make is leaving their device carts plugged in all the time, which is extremely hard on the batteries in the devices and dramatically shortens their useful life. One of the things we have done at Saugus USD, in an effort to save energy and extend the battery life of our devices, is install countdown timers for use with the laptop carts. The timers we use are actually outdoor light timers, with a piece of black tape over the light sensors. These timers provide an excellent mechanism for controlling power to the carts, and are very easy to use. As an added bonus, they provide a convenient way to turn power off to the cart prior to plugging and unplugging, which prevents the plugin "sparks" that can be rather "shocking".
How to use a cart timer
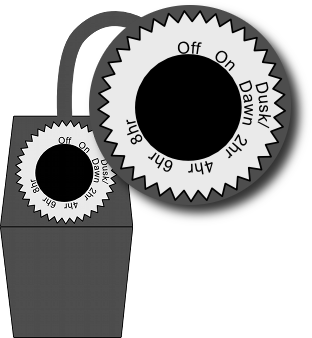
To use a timer, simply turn the dial to the desired setting (see below.) The current setting is almost always the topmost (closest to the power cord) on the dial. When the power is on, a red light will appear, and when it is off, the light will be off.
So, if you want to turn the power to the cart off, simply turn the dial until "Off" is at the top. You'll notice that the light will go out. To turn the cart on, turn the dial until "On" is at the top. You'll notice that the light will turn on. To set the countdown timer, simply turn the dial to the desired setting, either "2hr", "4hr", "6hr", or "8hr" and the timer will keep the power on for that time period, then automatically turn the power off.
When using a timer, please keep the following guidelines in mind:
- Some timers will charge for the amount of time on the dial only once, so you might have to unplug it and plug the timer back in to get it to turn on again. Be sure to test your timer before deploying it.
- When plugging and unplugging the timer, be sure to set the switch on the timer to "off". This will prevent the zap you might otherwise see when plugging and unplugging all the devices, and will also keep the timer switch from getting damaged.
- The timer should NEVER be set to more than 4 hours. 4 hours is plenty of time to charge devices all the way up. Depending on device use for the day, you might even be able to get away with charging for just 2 hours.
So, the process flows something like this:
Before any students get the devices out, students designated as "cart champions" switch the timer to "off" then unplug the timer from the wall.
- Designated students hand the devices out to their peers and they are used throughout the day.
- Designated students collect the devices and place them in the cart, making sure that they put them back in the correct slot and firmly plug in the power adapters to the devices.
- Designated students verify that the timer is set to "off" and plug it back into the wall. Once plugged in, they switch the timer to either 2 or 4 hours, depending on how much the devices were used. If they were only used a little, 2 hours will be plenty. If there was significant use, then set to 4.
- Designated students close the doors on the cart and lock the cart. Devices are easy to steal individually, but are much more difficult when locked up in a cart.
