Difference between revisions of "Apple Mac"
(2.0revs) |
(2revs) |
||
| Line 51: | Line 51: | ||
Your box should now look similar to the box below: | Your box should now look similar to the box below: | ||
| + | |||
| + | [[File:Mac-disk-partitions2.png]] | ||
If all looks OK, click the "Apply" button. | If all looks OK, click the "Apply" button. | ||
| Line 67: | Line 69: | ||
On first boot, if you are prompted for a password, the password is “password” | On first boot, if you are prompted for a password, the password is “password” | ||
| + | |||
| + | If your wireless works, then you are all done. If not, then it needs an updated Broadcom driver. | ||
Enjoy! | Enjoy! | ||
Revision as of 23:05, 21 June 2014
ubermix 2.x is now fully compatible with Apple Mac hardware with Intel processors.
There are two options for installing.
Erase and install only ubermix
ubermix can now install directly on Apple hardware by following these instructions:
- Download and create an ubermix install USB key, according to the instructions at http://ubermix.org/download.html
- Shut down your Mac and insert the ubermix 2.x install key
- Hold down the "option" key and press the power button to power up your machine
- Continue to hold the "option" key until you see the ubermix key appear as an available boot disk
- Select the ubermix key using the arrows on your keyboard and press the "return" key
The ubermix installer should boot up normally and allow you to install. Please note that this method assumes that you want to erase everything on your Mac and replace it with just ubermix. If you want to dual-boot, proceed to the instructions below.
Dual-boot ubermix and Mac OS X
Please note: these instructions do not apply to 2.01 or below. 2.02 was the first version to offer the easy dual-boot install.
These instructions describe how to set up a Mac to dual-boot ubermix and MacOS. Be warned: while the process is relatively safe, any misstep could result in the loss of data and the need to reinstall MacOS on your device. While I have personally successfully completed this process on many devices, I haven’t tested it on every possible situation. Proceed at your own risk.
Assumptions: These instructions assume that you have a current version of MacOS (ie Lion or newer) on your device and that the device has nothing but Mac OS on it.
If you are ready to proceed, follow these steps:
- Download and create an ubermix install USB key, according to the instructions at http://ubermix.org/download.html
- Download the “binary zip file” for the Refind boot manager from here: http://www.rodsbooks.com/refind/getting.html and install according to the “Quick install.sh instructions” here: http://www.rodsbooks.com/refind/installing.html#installsh
OK, now that we have all of the pieces in place, less partition our hard disk for ubermix:
- Open up Disk Utility from Applications:Utilities
- Click on your hard drive in the panel on the left (not “Macintosh HD”, but the disk above it that says “XXX GB APPLE…”. Note that yours may say something other than “Macintosh HD” if you have changed the name of your hard drive - adjust the remainder of these instructions accordingly if this is the case.)
- Click on “Partition” at the top of the right panel, then click on the “+” button underneath where you see the single “Macintosh HD” box (translate as necessary based on your disk name).
- Once the box has split in two, click on the “Macintosh HD 2” box, and click the “+” button again to add a third partition.
- Your disk will now appear to be in three pieces. Click on “Macintosh HD 2 2” and click the “+” button again to create another partition.
- Now that we have 3 new partitions, we need to adjust the names and sizes of each. Click on the “Macintosh HD 2 1” box, enter “8” in the “Size” box to the right and press the return key on your keyboard. You should see the size of the box shrink.
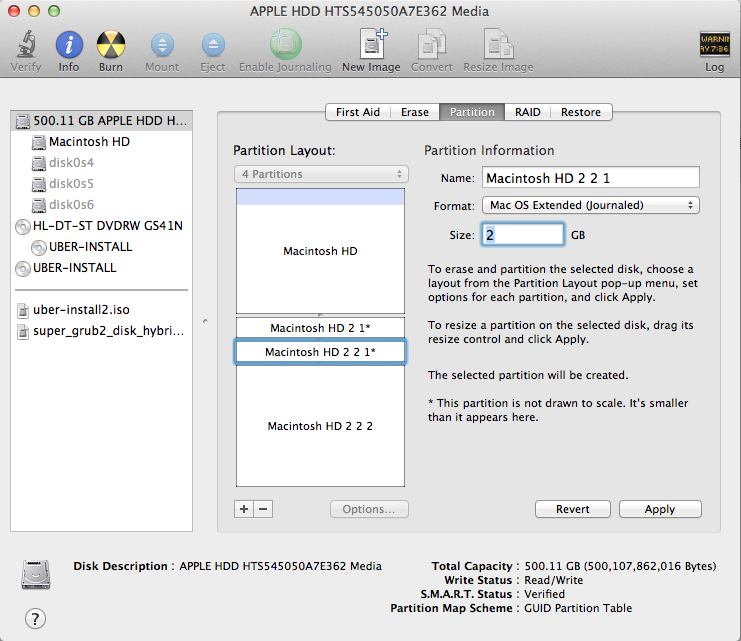
- Click on the “Macintosh HD 2 2 1” box, enter “4” in the “Size” box to the right and press the return key on your keyboard. You should see the size of the box shrink.
- The remaining partition "Macintosh HD 2 2 2" will use the remaining space, and be used for your home folder in ubermix.
Your box should look something like the picture below.
Now we need to rename these three partitions so that ubermix knows where to find them.
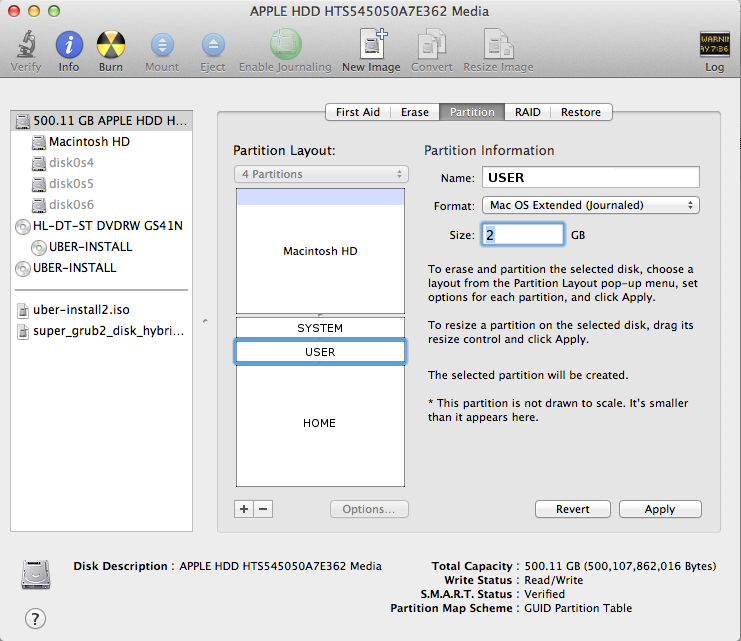
- Click on "Macintosh HD 2 1" (translate as necessary based on your hard disk name) and type "SYSTEM" (no quotes - all caps) in the name box on the right and press return.
- Click on "Macintosh HD 2 2 1" and type "USER" (no quotes - all caps) in the name box on the right and press return.
- Click on "Macintosh HD 2 2 2" and type "HOME" (no quotes - all caps) in the name box on the right and press return.
Your box should now look similar to the box below:
If all looks OK, click the "Apply" button.
OK, now we’re ready to actually do the install:
- Shut down your Mac
- Insert your ubermix USB key in your device
- Hold down the “option” key, and press the power button.
- Continue to hold the “option” key until you see a list of drives. Click on the USB icon (will say “Windows” under it, feel free to ignore) and press the return key on your keyboard.
- Your Macbook will boot up from the key, which should take about a minute. Once booted and at the ubermix install menu, press 1 then return.
- You will be prompted with an "It looks like ubermix is already installed..." message, giving you the option to upgrade or erase and do a fresh install. Do not erase as it will wipe your entire disk.
- The next prompt will ask you if you wish to format your HOME partition, which we want to do. Type "yes" and return.
ubermix will install normally and install normally. When complete, you will see the refind boot menu with an Ubuntu logo and an Apple logo. The first time you try to boot ubermix, it might fail if the EFI partition map didn’t update quickly enough. You’ll know if you see errors about “unable to find partition”. If this happens, simply hold down the power button until the Macbook turns off, press the power button to turn it back on, and choose the Ubuntu logo again - it should work just fine.
On first boot, if you are prompted for a password, the password is “password”
If your wireless works, then you are all done. If not, then it needs an updated Broadcom driver.
Enjoy!

