Difference between revisions of "Static IPs"
(Created page with "A number of school deployments use static IP addresses within their networks, in an effort to track student laptops and activities. We generally recommend against this, since it ...") |
(No difference)
|
Latest revision as of 00:20, 18 November 2011
A number of school deployments use static IP addresses within their networks, in an effort to track student laptops and activities. We generally recommend against this, since it generates a tremendous amount of time consuming work, as each machine must be configured individually. Instead, we recommend the use of Dynamic DNS, for which this release has been optimized. Each machine automatically sets itself up with a unique hostname, which makes DDNS an ideal choice.
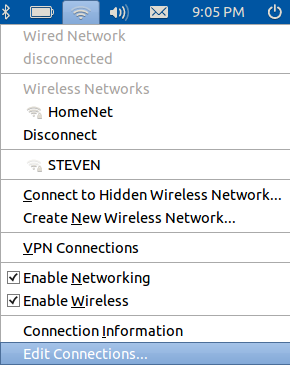
If DDNS is not available, the next easiest thing to do is to set up static IP addresses on your DHCP server, which will either be on a central server or within the settings on your wireless access points. if you wish to use static IPs assigned from a DHCP server, you will be required to obtain the MAC Address of the wireless interface, which is quite easy to obtain. Simply click on the ![]() icon in the top-right corner of the screen (near the clock) and choose "Connection Information." The MAC address will be listed next to the caption, "Hardware Address". Enter this in your DHCP server configuration along with the IP address you wish to assign it, and the laptop will always receive the same address when it connects to your wireless network.
icon in the top-right corner of the screen (near the clock) and choose "Connection Information." The MAC address will be listed next to the caption, "Hardware Address". Enter this in your DHCP server configuration along with the IP address you wish to assign it, and the laptop will always receive the same address when it connects to your wireless network.
Either DDNS or DHCP static IPs will save you from having to touch each machine and follow the numerous steps below to set a static IP. However, we also recognize that there may be some instances where this sort of setup is required. This, unfortunately, can be a bit tricky, as we will want to set the static IPS in such a way as to make sure that they persist in the event of a system restore (see Basic Usage for details on system restores). To set this up, perform the following steps:
- Boot (or reboot if it is on) and press ESC when you see the option to enter the GRUB menu
- Select "Normal Boot" from the grub menu (but don't press enter) and press the "e" key on your keyboard
- Select the line in the box that begins with the word "initrd" and move the cursor to the end of the line. Backspace over the four letters "aufs" and replace them with "generic". Do not add any spaces.
- Press "ctrl+x" on your keyboard to boot
At this point, the system will boot up directly from the system restore image, allowing you to make permanent modifications to it. Now all we have to do is modify our settings, adding the static IP. To do so:
1. Click on the ![]() icon in the top-right portion of the screen and choose "Edit Connections" (see below)
icon in the top-right portion of the screen and choose "Edit Connections" (see below)
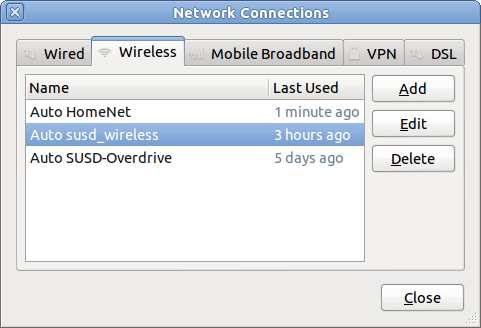
2. Click on the "Wireless" tab in the top part of the window that appears. Click on "Add" to add a new wireless connection
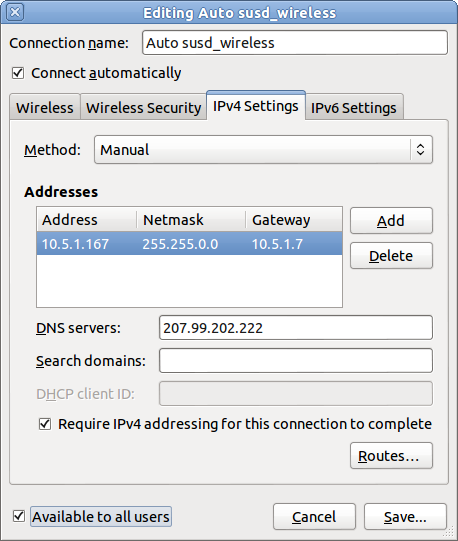
3. In the window that appears, check the "Wireless" and "Wireless Security" tabs to make sure they are set appropriately for your network. Then click "IPv4 Settings". Then 1) Change the "Method:" pop-up to "Manual", 2) Click the "Add" button and enter the appropriate info in the "Addresses" list, 3) Set your DNS settings to that which is appropriate for your network, 4) Click the "Available to all users" checkbox. See the example below for a completely filled out form.
4. When you are sure you have your settings correctly entered, click the "Apply" button to apply the changes. You will be prompted for a password, which is "password" (without the quotes). Once the settings are applied, your netbook should connect (or reconnect) to the network successfully. If it doesn't, repeat the steps and update settings until it does.
Now that the base restore image has been updated, reboot the machine and do a "Restore Factory Settings, as described in Basic Usage. Choose "Restore unit completely" to get the new settings to stick.


