About the default simple updates files on the key
If you are interested in doing some of the same things at your school or district that we are doing here at SUSD with the SWATTEC program, there are a few things you need to know to make the most of our modifications. These modifications include:
- Added the iTalc Client software, which enables the teacher to monitor, control, and manage all student laptops in an easy to use console.
- Customized the categories and icons, removing unnecessary icons from the interface
- Adds an icon to "Show System ID" under "System", which displays the netbook's host name. This makes the addition of workstations into the teacher's iTalc console easier in an environment where Dynamic DNS is used.
- Added scripts that automatically run whenever a network connection is established and download another script file from a web server, then executes it. This script enables mass updates and configuration changes. Could be used to run just about any program the moment a network connection is established.
- Adds a remote desktop server (VNC) for remote technical support on port 5901
If these features are appealing to you, then the following sections will help you to make use of them at your school or district.
Please note: In order to make use of these settings, you will need to apply the simple updates from an unmodified usb key. If you wish to further customize your installation key after applying the default SUSD simple updates, you MUST Rebuild the Base Image as described on the Customization page BEFORE making those additional customizations.
Contents
iTalc
iTalc is a program designed specifically for classroom environments that enables an educator to view and/or control the screens of all the computers in their classroom in an easy to use console. The program runs on Windows or Linux, although you can also use the management program on MacOS X using Boot Camp or virtualization technology such as VirtualBox. For basic usage information, see the iTalc Setup page.
Setting up the Management Workstation
To setup a management workstation, go to the iTalc site and download a copy of the installer. If you are using a Linux workstation for management as well, you may want to check the repositories for your distribution first to see if they already have one (Ubuntu does) and install it in the normal fashion. Regardless of platform, run the setup program and accept all of the defaults.
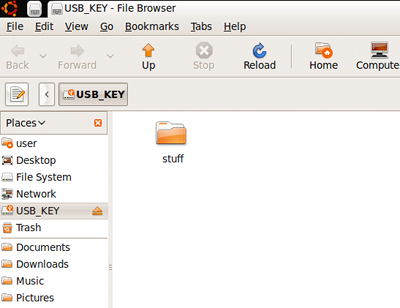
Once this is complete, you will need to get the authentication keys from one of the netbooks onto the management workstation so that the two can communicate. To do this, insert a spare usb key into the netbook and wait for it to mount. You should see a window similar to the one below:
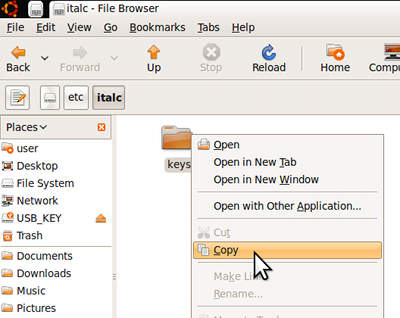
Click on "File System" and open the "etc" folder, followed by the "italc" folder. Then, right-click on the "keys" folder, and select "Copy"
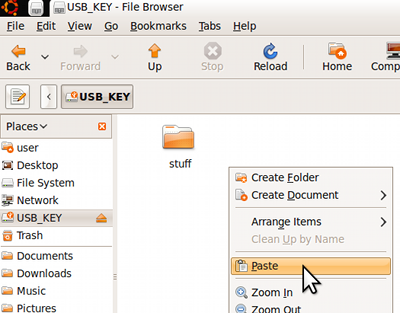
Next, click on back to your usb key ("USB_KEY" in our example - yours will probably be named something different). Then right-click in any blank space in the window and choose "Paste" to copy the files.
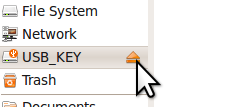
Finally, eject the key by clicking the little eject icon in the sidebar
Copy the keys folder to the appropriate location on your management workstation using the appropriate steps for your platform (should be similar to above.) For Windows, the keys folder needs to be placed inside C:/Program Files/iTALC and for Linux, it needs to be in /etc/italc
Custom Categories
For the SWATTEC modifications, we made an effort to simplify the interface and enhance reliability by modifying/moving/removing categories and icons from the interface. None of the tools are eliminated from the system - they are still accessible - they just do not have icons showing in the interface.
If you would like to apply further customizations to meet your needs, you can do this by using alacarte, which is already installed on the system. To run it, press "ctrl-alt-t" to open a terminal and type "alacarte" followed by the enter key. The application is fairly self-explanatory.
System ID and Hostnames
In order to make iTalc and other similar programs, it is important to be able to identify your netbooks in a consistent fashion so that the program can locate them each time they start up. Most networks use DHCP to assign Internet addresses to their workstations however, which dynamically assigns an address to a workstation from a pool. This often leads to workstations receiving different addresses each time they boot, which makes it harder to set up a tool like iTalc. While you could set up a static Internet address on each netbook (see Setting Static IPs) to prevent this problem, that process can be quite tedious and time consuming, as each netbook must be configured individually. As such, we recommend the use of Dynamic DNS, for which this release has been optimized. This allows you to enter a host name, rather than an IP address, to identify a workstation, in a similar fashion to traditional web addresses (www.apple.com, etc., etc.) Each machine automatically sets itself up with a unique hostname, which makes DDNS an ideal choice.
This does require a specific server configuration or it will not work, so be sure to check with your IT people to make sure they offer DDNS service.
The "Show System ID" simply reveals the workstation's hostname for use in programs like iTalc. See iTalc Setup for an example of how this works.
Network Auto-start Script
We use the network autostart script to give us the capability to apply updates to all of our netbooks whenever we have a need. At our district, we use the script as follows: when a network connection is established, the netbook retrieves another script file from a district web server and executes it. In that script, we can pull down and install files and updates and apply them to all of our netbooks. It makes maintaining them quite easy, so we would recommend configuring it for your district, even if you don't know for sure that you will use it.
The default network autostart script is in the user's home folder and is called ".network-autostart". Linux hides all files that begin with a ".", so you won't see it in any of the file browsing tools. The script doesn't do anything out of the box - it is essentially disabled. To edit it, open a terminal by pressing "ctrl-alt-t" and type "gedit .network-autostart". Your file will look something like the following:
#!/bin/bash
logger -p user.info "Network Autostart Script Starting"
if [ "`/sbin/ifconfig | grep -v lo | grep Link -A1 | grep inet `" ]; then
        logger -p user.info "An interface is up"
#       if [ -z `pgrep pidgin` ]; then
#               logger -p user.info "Loading Pidgin"
#               pidgin &
#       fi
#       sudo wget http://mirror.saugus.k12.ca.us/une1104/update.sh -O /root/update.sh
#       sudo chmod +x /root/update.sh
#       sudo /root/update.sh
fi
Note that lines that start with a hash mark (#) are disabled. Toward the top of the file are some examples of starting programs when an interface comes up. Near the end there is a line that begins with "wget", which contains the web address for the script file. Change this address to point to one of your web servers and remove the hash marks from the start of the the "wget" line and the two lines after it. You don't have to actually have a script on your web server to make this change, the script won't do anything if it can't download one.
Save the changes, and your netbook will be ready to self-update. Below is a sample script to install on the web server (for the netbooks to download):
#!/bin/bash

# Variables Section
#
# Set the WEBSERVER to the url location of the we server storing your updates.
# DO NOT use a trailing slash

WEBSERVER="http://webserver.yourdistrict.k12.ca.us/ubermix-updates"
REBOOT=false

# Functions Section
#
# Contains functions used by the script to handle updates. Do not delete.

standardInstall()
{
  # Performs a standard download and install of a file. Extracts any .tar.gz
  # file, making the assumption that the archive was prepared to be installed
  # from the root (/). Automatically installs any .deb using dpkg.
  # All files to download must have an accompanying md5 checksum file with
  # the same name+.md5 on the web server. To create this file, simply change
  # to the file's directory on the web server and do:
  #
  #	md5sum [filename] >[filename.md5]
  #
  # Function expects either 2 or 3 parameters in the following order:
  # 	1. name of file
  #	2. name of checkfile
  #	3. (optional) destination directory
  #
  # There can be no spaces in any parameter that are not escaped with a \
  # The purpose of the checkfile is to simply create a file in /root/ that
  # is used as a flag to indicate that the update has been installed (so that
  # already installed files don't get reinstalled every time.
  #
  # Function returns 0 on successful install, 1 for errors or already installed

  FILE=$1
  CKFILE=$2
  RESULT=0
  DESTDIR="/root/"
  if [ -n $3 ]; then
  	if [ -d $3 ]; then
		DESTDIR=$3
	fi
  fi
  if [ ! -e "/root/.$CKFILE" ]; then
	wget "$WEBSERVER/$FILE" -O "$DESTDIR/$FILE"
	wget "$WEBSERVER/$FILE.md5" -O "/root/$FILE.md5"
	if [ -s "$DESTDIR/$FILE" ]; then
		if [ "$(md5sum $DESTDIR/$FILE | cut -d\  -f1)" = "$(cat /root/$FILE.md5 | cut -d\  -f1)" ]; then
			if `echo $1 | grep -q tar.gz`; then
				tar -xzvf $DESTDIR/$FILE -C / >>/tmp/update.log
				rm -f $DESTDIR/$FILE
			fi
			if `echo $1 | grep -q tgz`; then
				tar -xzvf $DESTDIR/$FILE -C / >>/tmp/update.log
				rm -f $DESTDIR/$FILE
			fi
			if `echo $1 | grep -q .deb`; then
				dpkg -i $DESTDIR/$FILE  >>/tmp/update.log
			fi
			touch /root/.$CKFILE
			echo "$CKFILE update applied" >>/tmp/update.log
			rm -f /root/$FILE.md5
	  	else
	    		RESULT=1
	  	fi
	else
	  RESULT=1
	fi
  else
  	RESULT=1
  fi
  return $RESULT
}


# Main Updates Section.
#
# Add your updates here. See notes for standardInstall function above for
# details on how to use it


#Example
standardInstall showid.tar.gz showid_update


if $REBOOT; then
	xmessage "An important update has occured. Your netbook is restarting." & >>/tmp/update.log
	sleep 5
	reboot
fi
This script automates much of the update process. Read the comments in the script for details.
Remote Desktop Support
The SWATTEC updates also enable a VNC server on the workstation to allow for remote technical support. It is running on port 5901, which is often referred to as "screen 1" in popular VNC clients, and the password is set to "eeepc" by default. You may ask why this was added alongside iTalc - we did this because we have found it to be faster over slow remote links.


